Sunday, August 21, 2011

How did we do that?

As regular readers know, I have had a team in the 48 Hour Film Project every year since its beginning in San Diego. This year we came second in the whole competition, competing against a record 64 teams. We also received the audience award for our premiere screening and best sound design. We do not have a professional team; we only do this once a year with friends and family. For example, our festival winning audio was operated by a 12 year old, she was an actress for us in a previous years (thank you, Julianna.) The one exception is Jake Segraves (you may have corresponded with him through CineForm support) who does not quite have amateur status like the rest of us, with some real world production experience. Still, Jake and I shot two camera scenes with our personally owned Canon 7Ds, with a single cheap shootgun mic on a painter's pole (attached with gaffer tape) recording to Zoom H4n I got secondhand off a Twitter friend. The only additional camera for our opening scene is a GoPro time-lapse, shot while we where setting up for the first part of the shoot. This was not a gear fest, fast and light is key for extreme filmmaking within 48 hours.

As this is a CineForm blog, we of course used our own tools and workflow throughout this process. We used four computers, two regular PCs (Jake's and my office desktops,) an i7 laptop, an older MacBook Pro (for end credit.) During the shoot day, whenever we moved location, we would quickly transfer video data, converting directly from compact flash to CineForm AVIs stored on local media storage. That data was immediately cloned onto the other desktop PC using a standard GigE network. Getting two copies fast is so important, we have had a crashed drive during a 48 hour competition before. I used GoPro-CineForm Studio to convert the JPEG photo sequence from the GoPro Hero into a 2.5K CineForm AVI, and used FirstLight to do a crop to 2.35:1 and re-frame it. By 1am Sunday morning we had completed our shoot, ingested and converted all our media. One additional step that saved time for audio sync: I used a tool to batch rename all the flash media to the time and date of the capture, rather than Canon's MVI_0005.MOV or the Zoom H4n's default naming. Now all the imported media is named 11-35-24-2011-08-06.WAV or AVI etc, very fast to find video and audio pairs with the NLE, without properly timecoded sources. Last year we used Dual Eyes to sync the audio with picture, which works great, yet you have to make a secondary intermediate file which takes a little time, we found slating for manual sync and the batch renaming to be a tad faster. This was the first time we tried slating everything, and it was certainly worth it.

Starting at 1am Sunday, the value of FirstLight really kicked in. One of the two Canon 7Ds color temperature was way off, it seems my camera had overheated during 6 hours of operating under the San Diego sun (yet the other camera was fine -- any ideas on this readers?) The color grew worse from take to take, yet was fine at the beginning of each new setup (weird.) I had to color match the two cameras BEFORE the edit began, anything too hard to correct would be removed from edit selection (but I recovered everything.) This is where FirstLight has no competition, I color corrected footage between 1 and 4am, for every take in the movie, without rendering a single frame, without knowing which shots would make the final cut. The correction included the curve conversion for the shooting CineStyle profile to a Rec709 video gamma (Encode curve set to CStyle, Decode curve to Video Gamma 2.2), adjusting the framing for a 2.35:1 mask, images were moved up or down, others were zoomed slightly if needed (boom mic or camera gear in frame, etc) and adding some look/style to each scene. As the footage was already on the two editing desktops, we simply shared a Dropbox folder to carry all our color correction metadata. If you are not already using Dropbox with FirstLight, please learn more here http://vimeo.com/10024749. Through Dropbox the color corrections where instantly on the second desktop PC, Jake's PC, for our primary editing. The correction data for the entire project of 302 clips was only 144,952 bytes -- way less than one frame of compressed HD.

I set up the edit for base clips for the second half of the movie before crashing out for a two hour sleep. Jake arrived refreshed with more like 5-6 hours of sleep to begin the real edit -- I was secondary editor working on some early scenes (several of which didn't make the final cut.) Editing was done in Premiere Pro 5.5 using the CineForm 2D 1920x1080p 23.976 preset. We had some effects elements, so once the edit was locked for a segment, Jake saved the current project and sent that to me, and made a short segment for the effect elements, and did a project trim and sent that new small project and its trimmed media to Ernesto (our awesome lead actor and effects artist) running After Effect on my i7 laptop. The laptop was also sharing the color correct database via Dropbox. I loaded the latest full edit into my PC (relinking media to the local data,) while Ernesto was preparing the effects composition. I could now complete the color correction based on the edit Jake had competed around the effects area. Again we exclusively used FirstLight as those color corrections are automatically populating the AE comp. The trimmed media has the same global IDs as the parent clip -- why this works so well. Once the color parse was done (about 5 minutes is all I had time for with the pending submission deadline) Ernesto was done with the composition, we purged any cached frames so the latest color corrections would be used, then rendered out a new CineForm AVI for adding back to the edit.

This workflow resulted in very little data transfer and hardly any rendering for the entire project, lots of speed without quality compromise. The only other renders were tiny H264 exports emailed to our composer Marie Haddad throughout the day as the edit was locking in, as she was scoring the movie from her home. The final eight minute movie took about seven minutes to export to a thumb drive (I got a fast thumb drive, as they are normally the slowest element.) We sent a film off the finish line with 40 minutes to spare (a 30 minute drive.) We then checked our film to see what we rendered out from a second copy (we render out from both desktops at the same time.) Checking the audio levels - which were fine. If we had any audio changes we would have rendered only the audio to a wave file (only seconds) then using VirtualDub dub to replace the audio (only a 1 minute or so) -- you learn many shortcuts doing this competition for so many years. We sent a second thumb drive to the finish just in case, which was needed as the first car ran out of fuel (of all things?!) The second copy arrived with only 1 minute to spare.

Hope you enjoy our film.

Sunday, June 05, 2011

GoPro Hero 3D with LCD/viewfinder

Clearly there is no better 3D camera system for POV shooting than GoPro Hero 3D kit. If you already have a couple of Hero HD cameras, adding $99 for the 3D housing, sync cable and accessories is a no-brainer -- you got to do it. But what about non-POV, hand-held shooting? The 2D GoPro Hero HD allows you to add the LCD BacPac, for simple point and shot image framing, but the connector it uses (the HERO Bus™) is occupied by the sync cable required for the 3D to work. So we need to use the camera's video out drive another display.

I saw someone with a 7" Marshall monitor on a 3D GoPro at NAB, so I knew it could be done. I believed they had modified the camera, and I didn't want to do that, plus I wanted to expend much less on the screen. Also a large screen is not need for focus, everything is in focus on a GoPro. I found the perfect screen on ebay.com that was prompted as a "2.5" LCD WRIST CCTV CAMERA TESTER" with its own battery and NTSC/PAL video input, shipped for under $60.

The technical issue is the video out is in-between the stereo paired cameras, but there is a little bit of room if you modify a cable and trim the 3D housing, the cameras are untouched. The video connectors are tiny, I didn't have any of this size, so I hacked the video cable that comes with the camera, taking connector down to it core by crushing the plastic connector exterior in a vice repeatedly until it basically fell off. Using wire cutters I trimmed off the solder pads for the audio (red and white lines) so only the solder pad of the video (yellow) connection remained. Now only about 3-4mm of the connector will extrude from the camera. I removed the BNC connector from the cable that ships with the 2.5" LCD and soldered the video and ground lines the remaining connector elements.

To make this 3-4mm extrusion and newly attached video cable fit, I trimmed out a 'V' shape from the plastic wall that separates the two cameras using a pair of tin-snips or were they garden shears (whatever was laying around, did the job great.)

To mount the LCD, everything needed comes with camera or 3D housing. I used a flat sticky mount on the back of the LCD (on the lid of the battery compartment) and used the multi-jointed mount from the 3D kit to attach the LCD to the 3D rig. This allowed for nice controlled placement of the LCD.

At this point I've only spent $60 on the LCD and used exclusively parts and accessories that came with the camera/3D housing. To make this one step better, I used a spare magnetic LCDVF mount, so I can share my viewfinder between my Canon 7D and my new 3D rig. This has been so much fun to shoot with.

Thursday, May 26, 2011

MVC 3D cameras


We are starting to see a range of cool new 3D consumer cameras, like the Sony HDR-TD10 and the JVC GS-TD1, both great companion units to a GoPro 3D Hero setup. ;) The new Sony and JVC cameras record to a single 3D file in a Multiview Video Coding format (MVC) which is very cool, yet it currently has limited video editing compatibility. MVC simplifies the capture down to one video file for 3D, yet doesn't compromise resolution, like side-by-side 3D formats which squish the left and right view it one HD frame. MVC stores two full frames of 1080 HD, not that unlike CineForm's own 3D format. For editing only Sony Vegas 10.0d has any native MVC support and currently only for the Sony camera.


CineForm is planning conversion utilities for all common 3D sources, yet today there aren't any license-able MVC decoders available (we expect this to change soon.) At CineForm we develop our own compression technologies, yet license the standard based ones like MPEG2, H.264 and soon MVC. So what does a new MVC camera owner do in the meantime?

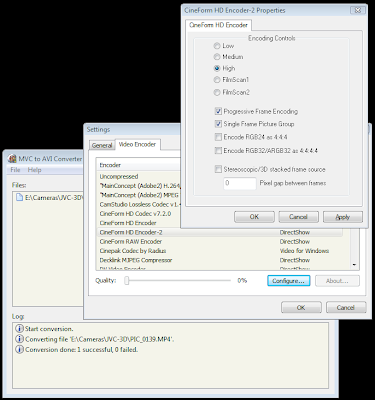
The developer of StereoPlayer has a solution suitable called MVC to AVI Converter for Windows, and it does exactly as it name suggests. While it is not a fancy utility, it has all the needed functionality -- you can select the "CineForm HD Encoder-2" with any CineForm Neo or Neo3D install, and even set the compression level and frame format (to match your source.)


The output will be a left and right CineForm AVI files that can be quickly Muxed into a new CineForm 3D using FirstLight. While this is one more step, the muxing process is completely losses and very fast, as is simply adds left and right eye views into a new file without re-compression. With your new CineForm 3D AVI or MOV file, you can now edit 3D within common video editing tools, adding 3D corrections with key-framing within FirstLight.

Please send me your youtube.com 3D link in the comments with you first successful use of this technique.

Thursday, May 19, 2011

Curves - CineStyle and S-Log, a workflow choice.

The tweets have coming fast with lots of recent activity around shooting curves, particular with the release of Technicolor's CineStyle (tm) profile for Canon DSLRs. I'm all for specialized encoding curves as I once helped developed the Log-90 curve used in the SI-2K (helped by Jason Rodriguez.) What Technicolor has done for Canon was a harder task, to squeeze the most out of an 8-bit heavily compressed H.264 for the best post correct-ability. For the basics on what these curves are doing, please check out my ridiculously long post 10-bit Log vs 12-bit Linear, or for a briefer coverage there is good info on this at prolost.com. In this blog entry I discuss what it might mean for your color correction workflow.

The resulting images from a CineStyle capture are flat and perceptually desaturated, all due to a reverse S-curve that emphasizes shadow detail as if negative contrast is applied. Technicolor very nicely has provide the restoration S-curve LUT (Look Up Table) to normalize the image for video display. So the capture through presentation pipeline is this:

All this bending of the light backwards and forward is about reducing the distortion and noise where it would be most perceived, in the shadows. The sample path without the CineStyle camera profile (Standard or Neutral) would have the camera applying something close to the stand gamma curve. Somewhere in the image processing path you are likely to apply color correction; the two likely places are just before or just after the CineStyle to Gamma correction LUT. You may also color correct without using the technicolor restoration LUT, if you target output is for a video gamma you are producing some of this curves features manually (not a bad thing.)

Consequences of applying color correction after the LUT. First note, the sample LUT is only 8-bit so if you want to do high-precision color correction (10-bit or greater), let's hope the CC tool being used is interpolating values between entries (we do this in FirstLight.) The bigger issue is the LUT contains flat spots, for which no detail can be extracted later, deep interpolation will not help. In the restoration of display contrast some values are flatten to black or white levels, so that post correction can't reveal the lost data. I wouldn't recommend color correction after or on top of the LUT, other than for minor corrections.

Consequences of color correction before (or underneath) the LUT (or not using the LUT at all). While the 8-bit flat spotted output LUT would still seem bad, color correction and previewing the results through the LUT is still a fine solution. The 8-bit is not such an issue on final output, most displays and present formats are 8-bit -- you simply don't want to truncate to 8-bit before you have obtained the look your are after. A new issue arises, you are now color correcting upon a unknown (to most NLEs) non-standard curve. If your color tool has post corrections for exposure or white-balance (and some saturation tools) generally need to know what the source curve is, as these are linear light operations.

To help illustrate this issue, here is the math for one stop exposure correction : Lifting a linear light grey level of 20% up one stop should become 40%. Each stop up is times two, and each stop down you divide by two. Yet with a wrong curve applied (such as not removing a 2.2 gamma used in this example) the same one stop shift would move 20% grey to 93%. Things can get messed up. White balance is also a linear-light gain upon R, G, B channels, so don't expect that Kelvin temperature slider to work the same as source with different curves.

Now if you simply color correct until it looks good, who really cares if the math is wrong, after all this is a creative process not a lesson in the math of optics. To get an apparent exposure change will be tweaking gain and gamma control for approximately the same look. But if you want your color correction sliders to do what they say, and have a easier time in post, here is how CineForm does it in FirstLight and in the new (upcoming) GoPro CineForm Studio line of products.

FirstLight has a control panel you many have never used called "Workspace".

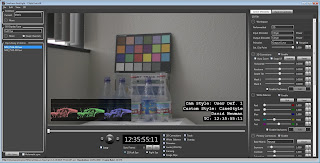
In the latest release of Mac and PC versions of Neo and Neo3D (v5.5.1) we have added CineStyle type curve ("CStyle") and Sony's S-Log curves for a current total of 12 different curve types. The defaults have the encode and decode curves set to "Video Gamma", this is correct for 99% of HD video source most users have been using. When you bring in a new CineStyle clip, default of Video Gamma is still set, but as this is only metadata you can change these parameters as you need. When changing both to "CStyle" the result is exactly as the source data looks, as shown in this screen grab.


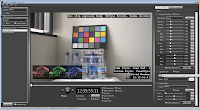
Side note: You can also see that the picture profile information is stored within the Canon metadata (which FirstLight can display) -- these tests were performed using a Canon 7D.

While adding the metadata "CStyle" for encode and decode doesn't change the base image look, it now allows white-balance, exposure and saturation control to work correctly. There is no performance or quality impact to set this metadata correctly. As I'm sure you have many clips, and as this data is per clip information, you can simply copy and paste these metadata settings across all imported clips.

With your CStyle encode/decode set you can now freely color correct with or without the restoration LUT applied. The CStyleLUT is also provided under the Look metadata. The LUT is the last operation in the FirstLight color filter stack, so LUT flat spots will not impact the correct-ability of the source.

However we can avoid the LUT completely (useful if you intend further corrections outside of FirstLight) by setting the Output (decode) curve to Video Gamma (or Cineon or S-Log or whatever your workflow uses.) Now the CineStyle is developed to the target output curve*.

* this does not use the LUT, rather a continuous curve that models the look without flat spots or bit-depth limitations.

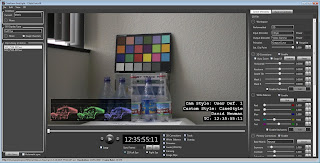
Revisiting the exposure example above, these images has been bumped up one stop (Exposure set to 2.0) resulting in two vastly different results.
Using CStyle vs ignoring the source curve.

Note: non-curve based exposure in FirstLight is simulated as producing this error is not standard operation in the tool. If I used the wrong encode curve, such at "Video Gamma" for a CineStyle source, the results are still wrong, but not quite as wrong as the right image shown here.

While I have used CineStyle for my testing here, the same benefits will be true for Sony's new F3 S-Log option -- I look forward to trying that out myself (hint hint, Sony.)

Thursday, April 14, 2011

My annual FreshDV NAB interview

See me exhausted after 4 days of our most exciting NAB every, discussing some of the impact of the GoPro acquisition of CineForm (yes it was that way around, we had many express their surprise that we brought GoPro.)

My FreshDV interview .

Technical corrections to the above. Sorry Resolve, I had temporarily forgotten your name. And I meant Phantom, not Viper, in the very end of the interview.

Monday, April 04, 2011

GoPro and CineForm

I know I own everyone a nice long blog entry on the recent GoPro acquisition of CineForm. Yes the team at CineForm is very pleased about this. In the meantime (with NAB so near), I there is no way can do better than this quote from John Hewat over on DVInfo.net:

"CineForm and GoPro make what I consider the two easiest, smoothest products that I ever get to use. I'm very pleased that they're together now. I rarely ever edit anything without converting to Cineform and I rarely leave the house without my GoPro."

Monday, January 24, 2011

Another overstatement that 3D won't work.

Roger Ebert, blog post : Why 3D doesn't work and never will. Case closed. with the help of Walter Murch, tries to use some science to explain that 3D won't ever work, but gets the science wrong.

Here is my reply (on his blog) in response to his post:

While there are issues with 3D presentation, the claim that the "convergence/focus" issue makes 3D unsolvable is false. There is an error made in the assumption that "the audience must focus their eyes at the plane of the screen"; while that is generally true for objects close to a viewer in space, it is not true for a movie screen "80 feet away."

In optics there is the concept of hyper-focal distances -- there is a focal distance in which a lens will resolve all objects at that distance and beyond such that they appear in focus. The human eye is just another lens. While calculating the hyper-focal distance of the human eye is tricky, and likely has a good degree of variance between subjects, the distance for theatrical viewing is well beyond the needed range for all but Superman. Various ways of computing the hyper-focal range of the eye suggests that objects from around 15 feet to infinity will appear in focus. That means a 3D presentation that has objects appearing no closer than 15 feet and beyond will appear in focus whether the audience is focusing at the screen plane or not -- the eye is free to converge and focus anywhere within the volume of space projected, just as it naturally would.

While there are many areas that can and should be improved, presentation brightness, left/right cross-talk, glasses comfort, and the artistic battle of shallow vs deep depth of field for 3D, eye focusing for theatrical presentations is not an issue.

I wrote more technical details about this when Daniel Engber's article in Slate made the same claim on my blog (here.)

David Newman

CTO, CineForm


Update 01/25/2011: I see that lots of people are reading this. Thank you for dropping by. Some twitter comments have asked "what about TV, that is less than 15 feet away?" Fortunately the same optical principles apply, just with a smaller 3D volume -- which I have covered prevously here. A theatrical 3D release which might have 3D preceived depth from half way to the screen to infinty, has its depth shrunk when placed on a 5-10X smaller screen, resulting in a 3D volume say from 6 to 30+ feet, which happens to be within the depth of field for the human eye for a screen placed 12 feet away. As the screen shrinks further, so does the 3D volume, allowing 3D to work within the eyes abilities at most scales.