This is not an official news source for CineForm or GoPro product releases, just some bits and pieces of stuff I happen to be working on. My work and hobbies are pretty much the same thing. -- David Newman
In the last few posts I have enhanced to support for camera RAW to CineForm RAW conversions, and this feature was released as part of the Windows Neo4K or Neo3D builds yesterday (Dec 09, 2010.) The DPX2CF tool itself has since undergone one more update to support stereo conversions of RAW sources.
DPX2CF v6.02 Download (replace in C:\Program Files (x86)\CineForm\Tools)
The syntax for raw sources is just like it is for stereo DPX conversions.
There is also a new stereo mode for sequences that a capture L,R,L,R,... or R,L,R,L..., for single camera motion controlled rigs. The switch -sL set Left eye first or -sR the right eye. Notice that the sample source path is used twice:
Note: There were a couple of minor bug fixes and also the new the ability to window the pixels you want. So if you only need the center 4K form a 5.2K RAW file, you do this:
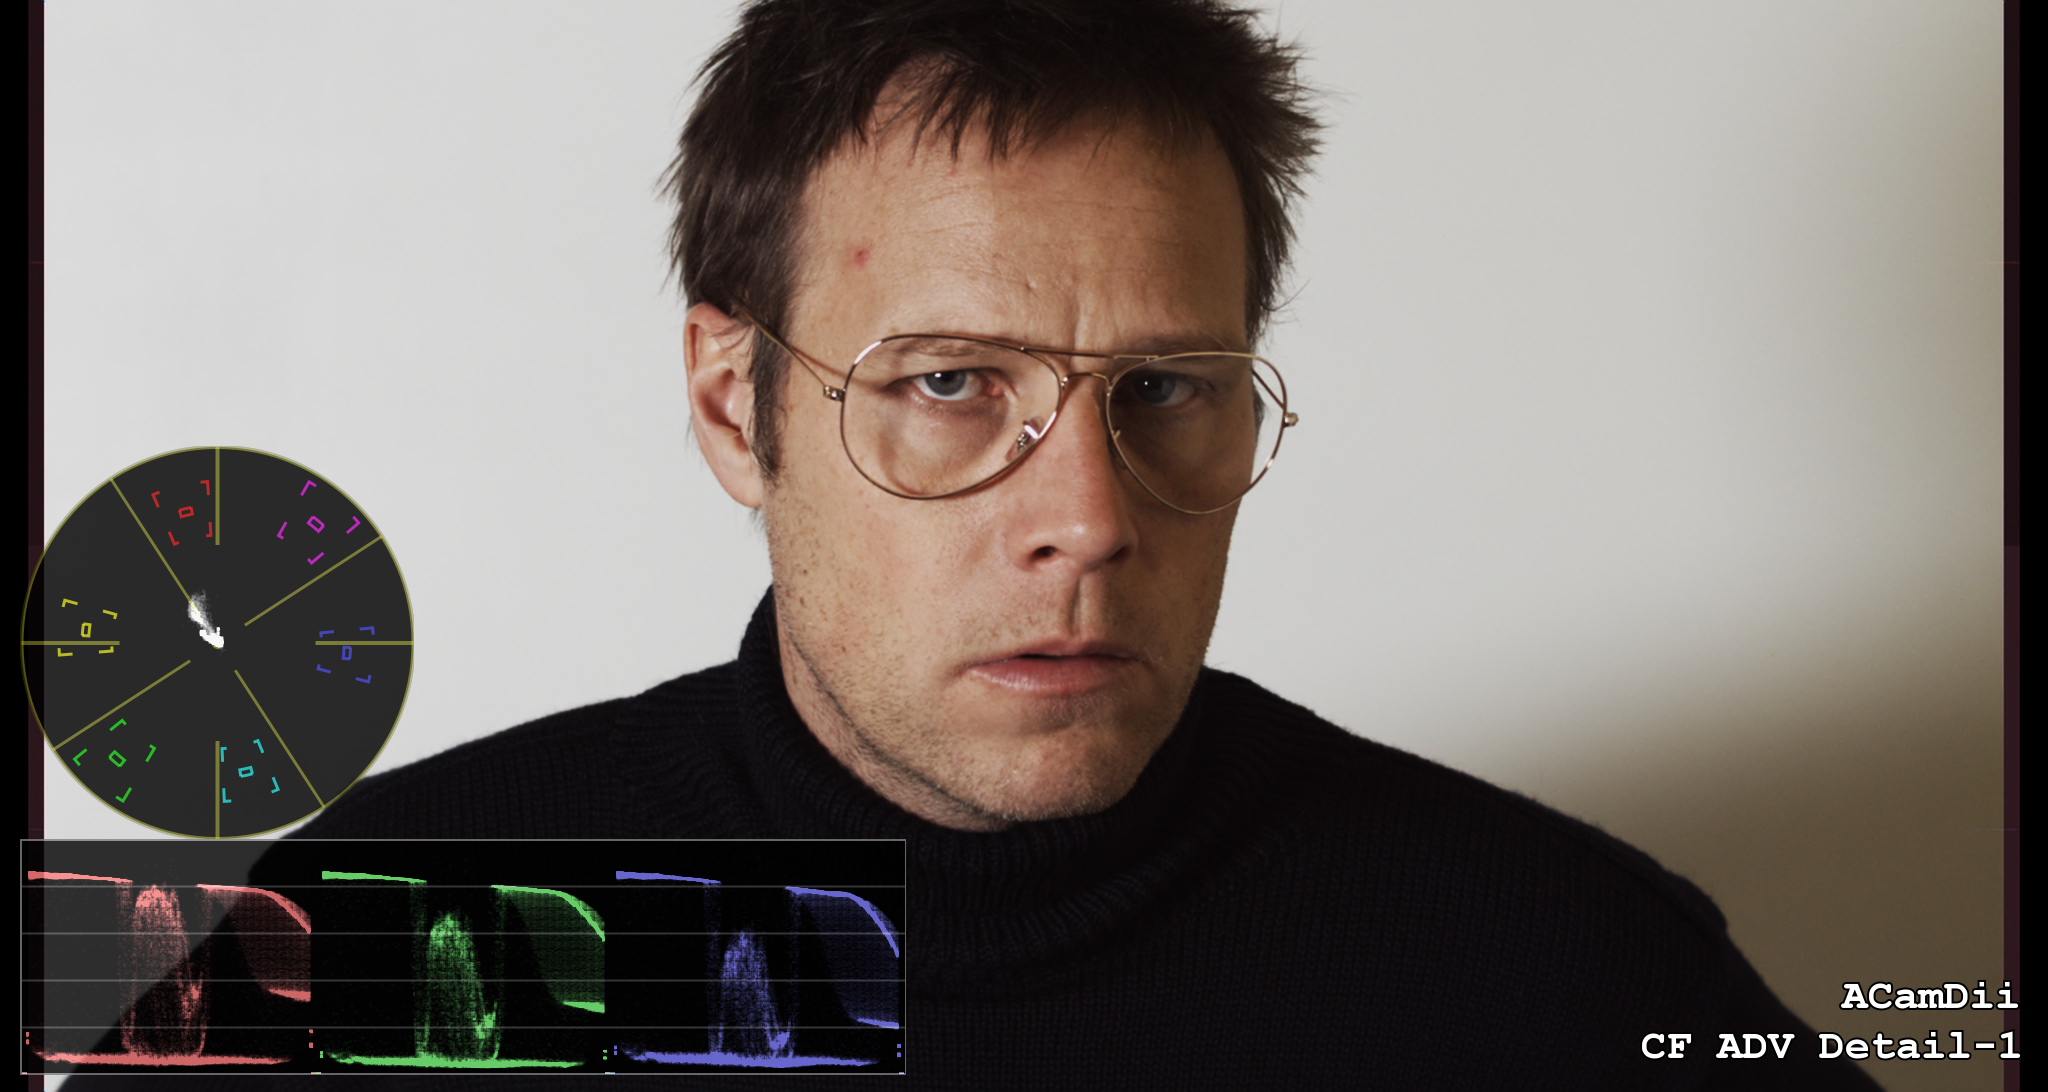
Now that you have your Camera RAW images in a CineForm RAW file (see last post), remember to set the demosaicing quality/look in FirstLight. There are currently 9 different demosaicing filters to select from, each we slightly different image characters for detail and sharpness. This is just another control you have over the development of motion RAW sequences.
Click on the image to the left for a closer look a several demosaicing options. These were samples of a DNG sequence shot with the new Ikonoskop ACamDii.
More metrics. Source 52 frames, 166MB as DNG files; compressed to CineForm RAW in Filmscan-1 quality is 20.1MB (used in examples), and CineForm RAW in Filmscan-2 is 33.5MB.
The FirstLight color database entry (unzip and double click) is only 476 bytes to convert this to this.
If you you would like to repeat these tests yourself, get the latest Neo4K or 3D and these DNG source frames.
For a while now I've been wanting to finish a Camera RAW to CineForm RAW converter, so after the long weekend of Thanksgiving, I've completed the first pass. As CineForm RAW is a motion format and camera RAW typically not, this particular hack is mostly for those wanting the highest quality processing for stop motion or timelapse video/photography.
So far I've only tested with Canon 7D .cr2 files (5184x3464 -- i.e. big for video) and ACamDII .dng files (standard 1920x1080) but the code library RawSpeed, is pretty versatile with this list of supported cameras. As RawSpeed is an open source project of Klaus Post, I have included my source with changes here, mainly a stub for the DLL and patches for ACam support.
So how to use this new tool. This is currently PC only, and it requires the use of the command prompt (yes very scary.) You will also need at least version 5.2.4.287 of Neo4K or Neo3D. As 5.2.4 is currently newer then the public release, download here Neo4K or Neo3D (these a 15-day trials if you don't already have an activation.) Uninstall any previous build and install the latest.
The RAW support is an extension of the existing DPX2CF tool, which now supports TIF, DNG, CR2, NEF, etc. Currently very few of the existing switches work with RAW sources, basically just frame rate (-fX) and quality (-qX). For a folder of sequential RAW files:
>dpx2cf v:\pics\*.cr2 v:\video\sequence.avi -f23.976 -q4
That is it -- it will batch all files with the name ending in .cr2 within the folder v:\pics\ and output to v:\video\sequence.avi. If you intend the results of the Mac:
>dpx2cf v:\pics\*.cr2 v:\video\sequence.mov -f23.976 -q4
In either case you will see the processing like this E:\CR2>dpx2cf *.cr2 new.avi -f23.976 -q4 Sorting on filename 705 frames found TC: base:24 loaded IMG_1987.CR2 loaded IMG_1988.CR2 loaded IMG_1989.CR2 loaded IMG_1990.CR2 loaded IMG_1991.CR2 loaded IMG_1992.CR2 loaded IMG_1993.CR2
...
If you are working with 14MPixel or above sources, your resulting videos are rather large, bigger than any video you will have attempted to play before (around twice the size of Red One footage.) As a result don't expect them to playback at 24fps, my home i7 920 plays 5.2K 7D sequences as 12fps. It is the demosaic computation that is slowing it down, so set the playback to half res (use the 'C' icon in the status bar,) at 2.6K I can play at 36fps. If you want to preview at quarter res (still better than 720p HD), download this registry patch, unzip, and double click on the .reg file to enable.
The real fun happens when you load these timelapse/stop-motion clips into FirstLight, CineForm's image development tool, all the RAW image glory is there for your tweaking. The image hasn't even been white-balanced yet, so all the data is there from the noise floor to the clipping point.
This Canon 7D image, shows a green tint as the sensor is more sensitive in that channel. In FirstLight all your color corrections are simply metadata, so nothing needs to be render for these results to be seeing in other tools.
Some interesting metrics. The CineForm RAW decodes many times faster than the source RAW file, is compatible with significantly many more video tools, and is 4-5 times smaller. The Canon CR2 files are 14-bit linear with a TIFF compression. 5184x3464 @ 14-bit is 30MBytes per frame, compressing to CR2 around 20MBytes per frame, is only 4.5MBytes per frame as a Filmscan-1 quality CineForm RAW file. Wouln't it be great to have CineForm compressed stills for our DSLRs.
Have fun.
----
Update: 11/29/10: while the binned camera modes like Canon's sRAW1/sRaw2 are in the compatible camera list for RawSpeed, they will not work with this RAW conversion tool which needs a true color filter array (CFA Bayer) image of the native sensor resolution (i.e. the best stuff.)
Update 2: Already getting great feedback. Fixed a bug that impact several cameras, just not the one's I was testing -- typical. I will refresh the main downloads around 12noon PST. If you have already downloaded Neo4K or 3D all you need is a this DPX2CF version v6.01 (install in C:\Program Files (x86)\CineForm\Tools.)
---
Update 12/9/2010: I have now used these tools for my own timelapse, have just purchased the Satechi controller for my Canon 7D. I generated this sequence from 12GBytes of 645 .CR2 files. These 10second exposures with a 15second total interval. Used a 28mm lens set to F2.0 at ISO 200. The resulting 5184 x 3456 CineForm RAW AVI was loaded into CineForm FirstLight for color correction and keyframed image cropping. This was then loaded into VirtualDub for scaling to 1920x1080. I use CS5 Adobe Media Encoder to produce the 1080p mp4 upload.
Source 645 frames 12GB CR2 compressed.
Compressed to a single CineForm RAW AVI at 2.6GB
Scaled to a HD CineForm 422 AVI at 700MB
Compressed to 30Mb/s H.264 at 100MB
Displayed on Vimeo at xMb/s??? (I hope something watchable is left.) :)
Update 2/22/2013: It continue to see a lot of interest in this blog entry, and the good news is the camera RAW to CineForm RAW is now a feature within the GoPro CineForm Studio Premium/Professional packages. For those that don't like to use a shell, you now don't have have to. The only downside, this is still Windows only -- we use a open source camera RAW library that is difficult to port to Mac, but we are working on a solutions for Mac RAW support.
I had two inquiries today on using native DSLR in today's modern NLEs vs CineForm intermediates. Both these users who knew to use CineForm for finishing, multi-generation and effects renders, but wondered if the native DSLR decoding of the NLE was now the same quality. While CineForm has been known for its performance and workflow advantages for mixed media, sometimes users forget we are solution for source file quality also. Pretty pictures to follow.
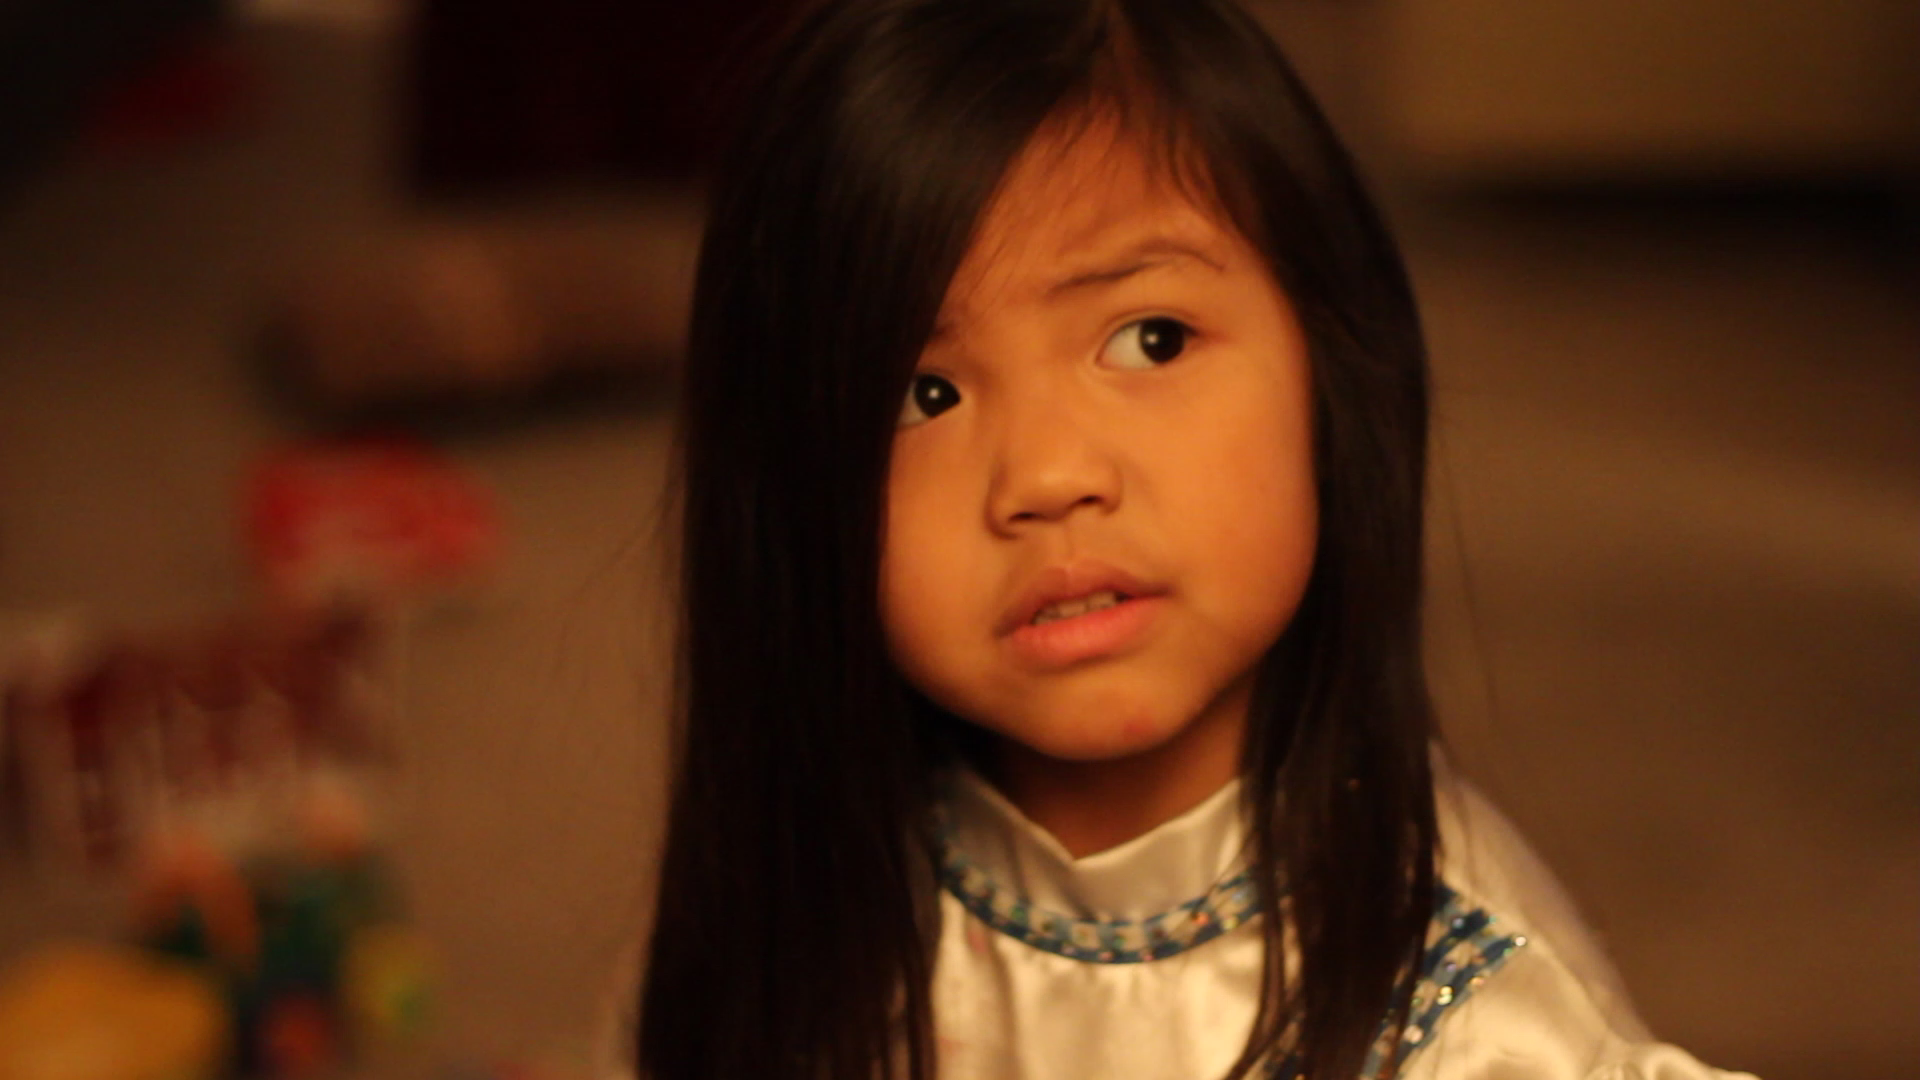
The linked image below was from one of the first videos I took with a 7D of my daughter in poor lighting with some ISO gain, and likely that plastic 50mm -- so not the best shooting conditions and in need for some color correction and maybe some sharpening. The more you have to correct the image, the more important the source image quality is.
Source converted with NeoHD's HDlink to a CineForm AVI imported into CS5 and output to a PNG (2.04MB).
Viewing the above linked images at 1:1, the CineForm and CS5 output will look identical, Vegas has a small color shift as it is likely not compensating for the 601 colorspace used in Canon DSLR cameras, but otherwise maintains the same detail and dynamic range. While both the CS5 and Vegas outputs have undergone less processing, it is the CineForm output that is more color correctable. You may have also noticed the CineForm source PNG is nearly twice as large as a either of the NLE native decodes. This is due to the CineForm output having more continuous tones, and a better 4:2:0 up conversion, resulting more "information" for the PNG compressor to store -- information is in quotes, as clearly there can be no more source data than the original MOV, yet there are image development choices they can make that limited data more useful to the filmmaker.
Zooming in on the source you can see some of the source's H.264 compression, but more apparent is the 4:2:0 chroma artifacting, greatly reduced in the CineForm output. The chroma artifacts can be seen as the break-up of the image into 2x2 pixel regions, particular where the chroma is change rapidly (i.e. color edges.)
The CineForm file's has no such 2x2 chroma break-up and produces more natural looking continuous tones, which are more suitable for extreme post processing via sharpening and color correction. Try it for yourself with the source data above.
All of this is independent to the amount of compression applied to the CineForm file. So while there are some that insist native is the ideal, and that a using an intermediate is a compromise, I think these images help demonstrate that with the right up-conversion, it is a compromise not to. :)
-------------------
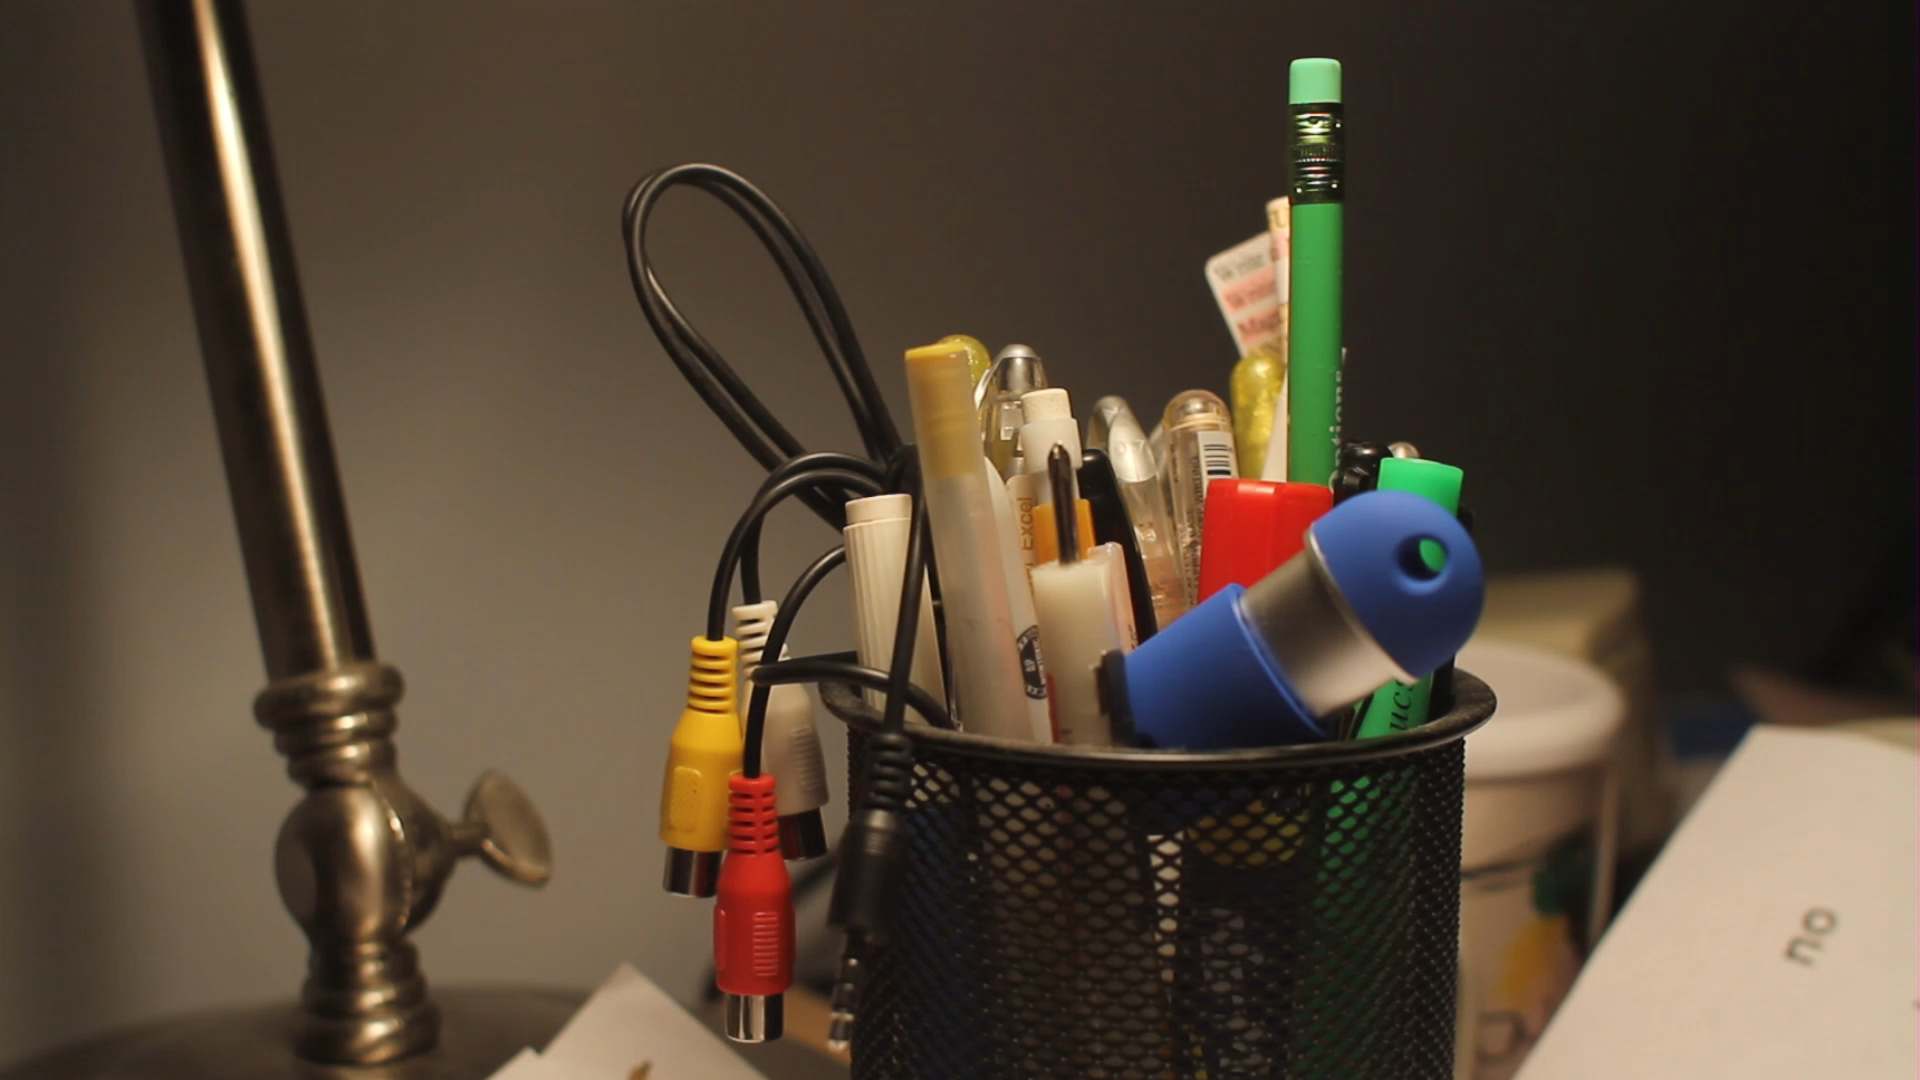
Update: I realized after posting that the face is actually more forgiving with these chroma artifacts, so I shoot a scene with sharper color transitions.
Even without any zoom, the resolution loss at the color change boundaries is quite apparent. If you are not seeing it, look at the top red edge and the curve in the blue, and pump up the saturation. As saturation increases the perceived resolution drops approaching quarter res HD.
While these are considered common 4:2:0 artifacts, the CineForm image is from the same 4:2:0 source. All images benefit from this style of up-converison filtering -- I just wish my HDTV would do it, as I feel I'm watching 960x540 for the many deeply saturated TV shows.
------
Update 2: Some may perceive the chroma jaggies as sharpness, when fact all outputs are equally as sharp in luma. The jaggies in the chroma make artificial edges that eyes can see as detail, even though it is false detail. This false detail will make any downstream sharpening more difficult. Just as it is in the camera setup, you do not want artificial sharpening, as you can add sharpening later, but it is much harder to remove.
This blog entry discusses how we at CineForm successfully presented the San Diego 48 Hour Film Project in HD (for the fourth year,) while the 90 other city locations for this competition are still presenting in SD off DVDs. This is a common problem for film festivals in general, so many of the short programs are still shown SD only, often using the cheap low-res advertising projector while there is a beautiful Christie 2K right next to it. I hope this information maybe of use to others seeking to improve their festival presentations, while not blowing the budget.
Over the four years of doing these San Diego festival screenings, the playback hardware and software selection has change drastically reducing the costs form year to year. Initially we use a Wafian HR-F1 portable field recorder, which is awesome for this purpose, but it is not something many festivals have ready access to. We were going to use a CineDeck this year, which is also perfect and ultra small, yet our unit was in the shop for an upgrade. What we ended up doing was using a range of free and low cost tools on a standard PC to convert and present over 6 hours of content over two nights, with sponsor reels and interviews, inter-cut with 50 short films. Here is how.
Firstly, no matter how clear you set submission guidelines, films will come in with vast array of compress types, frame rates, pixel ratios, resolutions, and audio issues. While this is exacerbated by the nature of this particular extreme film-making competition, it occurs to some extent in of all festivals submissions. As we were presenting CineForm 1920x1080 4:2:2 progressive at 23.976, many teams submitted this way (thank you), all other films were batch converted to this format using the basic features of CineForm's NeoHD. By normalizing the content, we can eliminate potential playback issues, varying CPU load and disk bandwidth requirements. Also by normalizing to CineForm we can address other submission errors, like incorrect black levels and odd image framing without a time-consuming re-render.
To present a complex playlist, you could throw everything into an NLE and playback the timeline, but we have never chosen to do that, as reliability and playback without a frame drop is on the highest importance (to me) and the NLE adds an additional layer of complexity. Also seems to add more compute time, for example, generating hours of audio waveforms that will not be used.
For playback this year we used Media Player Classic and AVISynth. Last year we used MPC alone, driving a Blackmagic Decklink card at 23.976 PsF, and used its built in play-list abilities. This worked responsibly well, but we did a have a failure once doing that, and it is missing a few features that AVISynth addresses (audio level control, trimming and resampling.) We continue to use the Blackmagic cards as it is very easy to make MPC play through them as the default renderer, outputting for both audio and video. I haven't tried the AJA DirectShow filters, so those excellent cards may also work. To use DirectShow enabled HDSDI card, all you do is add their output filters as the preferred output (see screen capture.)
The reason to use an HDSDI card for audio and video, there will be no issues with audio sync drifting slightly over an 90+ minute plus presentation, as audio and video are clocked together with the same hardware. A frame of video is presented with the correct number of samples of audio. Whereas running image data over DVI and sound over the PC inbuilt audio, is doable yet not ideal. Picture data is slaving to the audio track which is clocked separately, and the 24p is typically presented over DVI 60p with pulldown that is added based on the audio clock. Not to put you off, DVI works, HDSDI is just better.
AVISynth kicks in to the manage the play-list rather than using the MPC play-list, it allows you to play a trimmed source, remodulation and fix audio levels, all on the fly. With AVISynth, instead of loaded a single AVI into MPC, you load AVS script, a simple text file that describes the actions you need. Here is most of one of the scripts we ran a few days ago for the San Diego 48Hour.
This script was called GroupA.avs and loaded its Media Player Classic, and it appears in MPC as a single movie with length a frame accurate sum of all of the segments, which can be scrubbed and played from any position. The above linked example will play 10 films, 4 interviews and 4 sponsor reels, fixing audio levels and sample rates while it was playing, trimming off unneeded color bars and black lead ins from the films. I cut and paste these scripts for each screening group, making new play-lists has easy.
So far we used for playback: A PC -- any dual core desktop purchased in the last 3 years would be plenty fast enough. A free CineForm Decoder (although NeoHD was use to encode the files -- doesn't need to be on the playback system.) A free player in Media Player Classic A free scripting engine in AVISynth An optional $700 Blackmagic card or similar (you can use a second DVI port to go without.) It is best to select an HDSDI card with analog audio output, the easiest to hook up to the theater sound.
To make the control experience more fun, we added a wireless router, and used a remote desktop application on an iPhone to drive MPC from within the theater. I used iTap RDP, but other remote desktop apps also worked fine. It is a lot of fun having a remote for a 40-foot movie screen. This way we could have speakers before, after and maybe even during the presentation, pausing or moving the play position as needed. Scripts where simple to customize, e.g. we had to add 4 seconds of black to the trim on two films to allow time to switch in the CinemaScope lens (those films looked extra awesome.) I only missing controls I'd likely are WiFi controls over the house lights and automation of that scope lens.
The one additional purchase, a $20 desktop fan. We had a backup PC for the first time in the four years we've done this, it turned out to be needed on the first screening night. It seems desktop PCs don't like running in 110F ambient room temperatures for 5 hours -- the projection booths are not always air-conditioned and they is a lot of hot gear around. It wasn't so much a CPU issue, which barely being used at 20% (we had overkill 6 core Gulftown systems,) but the media drive that overheated (those Western Digital Black drives are fast, but get rather hot.) The next night, I took the side off the PC, pointed a fan on the drive, and it played beautifully all night.
While a PC+MPC+AVISynth is not the easiest solution, as I understand that many feel scripting in any language can be overwhelming, it is likely far lower cost than renting HDCAM decks and switchers needed drive HD the more traditional way. We are working with other film festivals to help simplify their HD presentations and CineForm does intend to add more GUI support to play-lists within our own tools (for those script phobic.) After all we know extreme film-making competitions for 3D will be next, and we will need be a simple playback solution for that.
---
And why do we work so hard on this? So we at CineForm can see our own entries in HD on the big screen. Here is my team's film for 2010:
We drew the genre Dark Comedy, the required elements: Prop: A Chair Character: Dr. Rita or Rick Hernandez Line of Dialog: I'm trying my best.
I posted this in response to recent thread on CML, but seems it might be of interest to others, so it is reproduced here:
----
Whether RAW is from a CFA Bayer sensor, vertical striped sensor, or three chip source, there is no desirable true sensor RAW, as all camera manufacturers do (or should do) some pre-processing. Direct sensor data is not pretty; you want black balancing, fixed pattern noise (FPN) removal, non-linearity fixes, all applied before "RAW" is recorded, as these are hard to correct for in post. Dual Link HDSDI has its RAW data log encoded (lossy) and packed into 10-bit, yet it is still "RAW" to the workflow, and significantly better than if it was left in linear and truncated to 10-bit. Whether the pre-processing is FPN removal or 10-bit log encoding, these are only to make the workflow easier, to help deliver an image with the greatest creative potential into post.
Part of the thread discussed whether compressed RAW is RAW at all. My company kind of invented the field of compressed RAW, and first publicly launched this as the compression within SI-2K. I argue that compressed RAW is RAW, given that all pre-processing in camera is only to make the image more usable in the workflow; so as long as that processing doesn't reduce the creative potential downstream, it is still RAW. Compression is only another pre-processing step to help the acquisition and post workflow. We see Red One's success because of its compression, not in spite of it. Can compression be used without "reducing the creative potential?" Absolutely, and the 2009 Oscars helped prove that. On a technical level, pre-processed sensor linear to 12-bit log compressed at 4:1 (average SI-2K compression level) is potentially less damaging than linear to log 10-bit for DPX storage.
As for comparing uncompressed to compressed, that is happening everyday for many SI-2K users--shoot a detailed scene in the FS2 mode on the full body camera, and it will occasionally leave some frames uncompressed, every 4 to 8 frames or so. This is not for quality reasons; rather it helps manage computer resources for a CPU limited device (all the compression is happening in software.) The compression is so lite, it is impossible to tell whether you are decoding a compressed or uncompressed frame. Finally, when you consider the CFA Bayer style RAW, which is not a usable image without a demosaic (the process of guessing the missing chroma values, which has no true/ideal solution,) compression is even less of a factor. We have customers converting uncompressed Phantom HD to CineForm RAW, as they prefer the demosaicing options (currently 9 of them.) So compression is not impacting the quality anywhere near as much as the demosaic filter, which most post workflows simply accept as if it were nothing more than a format conversion.
When all manufacturers use the term RAW, that simply means they have made their best efforts to apply no creative image development in camera -- seems like a reasonable definition to me. We only now need to compare the results, not the in camera process.
This film was finished well before Neo3D v5 was out, but thanks to an excellent partnership with the editing team, Don Wilson and the crew at Evergreen Films, we were able test out the upcoming features and develop new tools to help make this project happen. Special credit for Craig Davidson, our lead Mac developer, who is mentioned in the article as "They had a code-writer at our disposal." CineForm does it best to be every film-makers off-site "code-writer". :)
The recent archive on osnews.com by Eugenia Loli-Queru has created quite a stir, revealing that camera licensing from MPEG-LA (for MPEG2 and AVCHD encoding) is for "personal use and non-commercial" applications despite the professional nature of the cameras for which this restriction seems to be attached. This was then picked up by Matthew Jeppsen at FreshDV.com. In both articles CineForm is mentioned, fortunately in a positive light, so I decided to have a go at the subject.
We (CineForm) are an MPEG LA licensee (just like everyone else in the video business) as we decode MPEG2 and AVCHD (H.264) sources when converting them into our format. These decoder licenses are straightforward, and are not expensive - after all decoding of distribution formats is to be expected and widely available. Yet a video camera that encodes to a distribution format seems to be burdened by an ill-fitting license model (wasn't it already burdened by ill-fitting compression ;) .) An MPEG2/H.264 encoder can be used for one off encodes (non-commercial use) or for producing a bit-stream that is going directly out cable or satellite (which we should expect to have a greater license fee.) When patent holders joined MPEG-LA (a good idea to have one licensing clearance house) they were thinking of an asymmetric system, one encode per million decodes (satellite to cable box.) Cameras changed that by introducing many more encoders, and this model emerged after MPEG-LA was established (we were all shooting analog or maybe DV back then.) If you wanted a truly professional camera-friendly license, MPEG-LA would have to go to all the patent holders to re-negotiate -- that is not likely to happen. The camera vendors chose a license from the existing MPEG-LA agreements that is the least onerous to them.
Well that is my total guess on the subject. I'll extend that guess as I believe that camera owners/shooters are not what MPEG-LA was setup to seek licensing from, and those users are not likely to be a source for additional licensing fees in the future.
Each year I have traditionally headed back one day before the show ends as I'm normally completely exhausted and have lost my voice (I'm of little use in booth presentations.) While by voice is at 50%, this was the hardest year to leave early, as we have been so warmly embraced by customers (old and new,) and by the many business partners (old and new) who spent time at our booth (and us in theirs.) CineForm was on show in more places than I could list (and likely just as many I didn't know about,) but to name a few: from the new P+S Technik 16mm digital camera back as CineForm RAW encoder, to NVidia show CineForm 3D editing under CS5, to DVS showing CineForm on Clipster, and Panasonic and AJA showing 3D workflow based on Neo 3D; I even discovered the awesome GoPro booth 3D demo was edited on Sunday night just before the show opening used Neo 3D. Special mention to CineDeck who shared a booth with CineForm, showing a native CineForm 422, 444 and 3D mobile (tiny) recorder, they won the Vidy Best of Show award.
This NAB demonstrated we are no longer perceived as a compression company. We used to spend much or our show time explaining that with CineForm "visually lossless" actually means something, and that compression need not be a dirty word. At this show compression hardly came up, as we are solving workflow problems across so many capture, post and archive needs, that compression is just one of the many tools we have to exploit. CineForm is about easing the post production workflow. Even third party announcements helped push our story, particularly the new that Avid's Media Composer 5 will support CineForm MOVs without ingest, meaning we now support all of the big three 'A's, Avid, Apple and Adobe, enabling the CineForm workflow in an interchangeable way between all your tools -- which has always been our business goal.
With my busy NAB schedule I do apologize to those I didn't catch up with, to the several that had to make many booth visits to do so. Also as I was away from the booth in so many positive business discussions, that missed several press opportunities, but I'm pleased to say that did catch up with the guys at FreshDV again this year, which you can see here:
CineForm color and 3D corrections tool FirstLight is completely database driven, with no need to render any element. Yet we want to share color corrections and other database changes we do need to export something, don't we? I've just post my second tutorial video on vimeo that shows how to share you color correction automatically using Dropbox (dropbox.com.)
The tutorial demonstates a custom utility that help that can be downloaded from here. Unzip and double click on this VBScript to move your LUTs and color corrections into your Dropbox folder.
Sharing color database information automatically among editing station is a feature CineForm has planned for some time. Yet finding the development time had put this project off, until we realized that Dropbox offers most of the base features we needed, and for free. The one thing it doesn't do is resolve the conflict if multiple users are changing the sample clips color/3D info at the same time, there is no priority or check-in systems with Dropbox. Yet this issue can be avoiding through the user practice of branching color databases, as I show in the tutorial. Users can work on their own branch and the "check-in" is simple the email/hand-off that saying my new stuff in is in data "x-y-z".
The reason I performed this demo using the beta version 4.3, is we made one subtle change to accommodate the Dropbox sharing. The histogram, overlays and 3D display mode features (which I sure to put in an upcoming video demo) were linked in the database within early versions, this meant a user enabling these features could remotely change those settings on another users system. While the branching practice above fixes this, I didn't want one user's render messed up by another user turning on histograms -- Imagine the support nightmare. Version 4.3 is now available.

 The FirstLight color
  If you you would like to repeat these tests yourself, get the latest Neo4K or 3D and these


